Please ask for correct address to send entries to. Ask secretary for organiser's email.
Resizing jpegs. Simply ensure width is max 1600 pixels if in landscape format; if portrait format, ensure height is 1200 pixels maximum.
A resolution of 72 is fine. More detailed information follows.
Resizing jpegs. Simply ensure width is max 1600 pixels if in landscape format; if portrait format, ensure height is 1200 pixels maximum.
A resolution of 72 is fine. More detailed information follows.
(Preparing a digital image for the competition.
Max 1600 width x 1200 height
Step 1: Resizing the image: The images will be judged at a max. resolution of 1600 x 1200 pixels. The 1600 is the width across, so you have a landscape format area to work with.
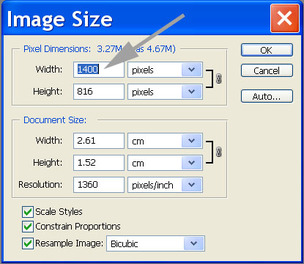
(Previously, the max. resolution was 1400 x 1050 - as shown opposite on the 'Photoshop' screenshot.)
First you should resize your image to fit within that pixel area. You will want to maintain the proportions of your image, so you may choose to add a background colour to fill the remaining space.
If you don't - it will be judged with a black background.
Finally, the PAGB has now specified that the sRGB colour space will be used. This is the default
setting for Adobe and most other image editors.
In 'Photoshop', Click on the Image menu, select Image Size, the image dialog box is displayed (see left).
Firstly, make sure the units you have selected are "pixels" (top centre of the box).
Next, enter the width you want, for example 1600. The height will adjust automatically. Check the height, if the height is more than 1200, then you need to enter 1200 in the height - this will reduce the width to less than 1600 pixels. Click OK.
Tip: many people will talk about "file size" or "dpi" - none of this is relevant here, you are measuring in pixels only.
Step 2: Adding a background: (not necessary)
If your image is not exactly maximum sizes then we will judge it with a black background filling the remaining space. If you want to choose some other colour than black then you can do so. With the resized image from Step 1: Firstly, set the background colour on the colour palette to the colour you want.
Next, click on the Image menu, select Canvas Size. The canvas size dialog box is shown.
Max 1600 width x 1200 height
Step 1: Resizing the image: The images will be judged at a max. resolution of 1600 x 1200 pixels. The 1600 is the width across, so you have a landscape format area to work with.
(Previously, the max. resolution was 1400 x 1050 - as shown opposite on the 'Photoshop' screenshot.)
First you should resize your image to fit within that pixel area. You will want to maintain the proportions of your image, so you may choose to add a background colour to fill the remaining space.
If you don't - it will be judged with a black background.
Finally, the PAGB has now specified that the sRGB colour space will be used. This is the default
setting for Adobe and most other image editors.
In 'Photoshop', Click on the Image menu, select Image Size, the image dialog box is displayed (see left).
Firstly, make sure the units you have selected are "pixels" (top centre of the box).
Next, enter the width you want, for example 1600. The height will adjust automatically. Check the height, if the height is more than 1200, then you need to enter 1200 in the height - this will reduce the width to less than 1600 pixels. Click OK.
Tip: many people will talk about "file size" or "dpi" - none of this is relevant here, you are measuring in pixels only.
Step 2: Adding a background: (not necessary)
If your image is not exactly maximum sizes then we will judge it with a black background filling the remaining space. If you want to choose some other colour than black then you can do so. With the resized image from Step 1: Firstly, set the background colour on the colour palette to the colour you want.
Next, click on the Image menu, select Canvas Size. The canvas size dialog box is shown.
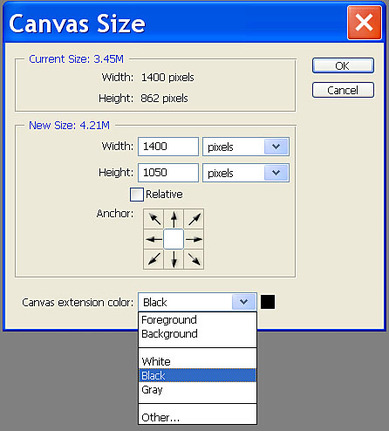
Again, make sure the units (centre right) are set to pixels.
Type in 1600 for the width and 1200 for the height. Click OK. (1400 x 1050 will project smaller.)
Your image canvas is now enlarged to show the picture and the spare margins around the outside.
Step 3: Saving the Image:
To save a file as a JPEG file, click the File Menu, select Save As.
Step 4: You may choose to add a white border line around the image.
Open the image. Hold ‘Ctrl’ and press ‘A’. Then select ‘Edit’ and ‘stroke’ from drop down choice. Choose a width of 2 or 3 pixels and colour (white) click OK. Then double click on image.
Before you submit your images make sure that you title them correctly.
